
Home » Archives for January 2010
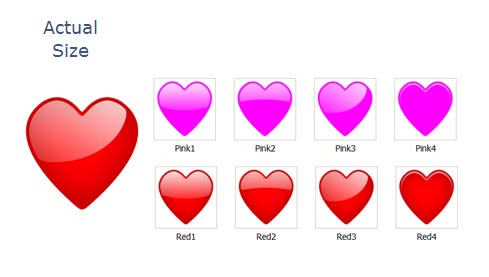
Free 20 Colorful Resources For Valentine’s Day
Icon Designs
![]()
URL : http://www.icondrawer.com/free.php

URL : http://dezignus.com/loveicons/
URL : http://www.mouserunner.com/Spheres_Free_Hearts.html

URL : http://dryicons.com/free-icons/preview/valentine-love/
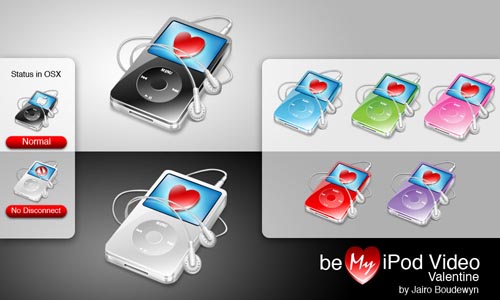
URL : http://weboso.deviantart.com/art/Be-my-Ipod-Video-Valentine-29027285

URL : http://dezignus.com/ribbons-bows-badges/
Brushes Set

URL : http://cubsocer10-stock.deviantart.com/art/Hearts-Brush-Set-51257101

Take This Precaution Before Working On Your Computer!
If youre going to open up your personal computer case to check some computer hardware components or clean up the hardware you must take the precautions listed. Computer motherboards and components, such as the sound card, video card, and memory, contain very delicate Integrated Circuit (IC) chips. It is necessary to protect computers against damage from static electricity. A brief explanation of static is its a major contributing factor in the breakdown of computers. Eliminating the damage from ESD (Electrostatic Discharge) can save a lot of money. Here are some things you must remember and precautions to follow whenever you work on your computer.
1. Unplug the power cord to the computer before opening the case to work inside of it. With the cord unplugged you are sure there is no power to the motherboard.
2. Since there are capacitors in the computer which can store a charge for short periods of time, it is a good idea to wait a few minutes after unplugging the power cord before working on the computer.
3. A properly grounded wrist strap may be gotten from an electronics store to prevent ESD. Use one of these before touching any components inside such as hard drive, video card, memory stick, etc. If a grounded wrist strap is not available then make sure you touch a grounded object such as a metal pipe to discharge any built up static so you don’t “Shock” your components.
4. Hold components by both edges and try not to touch the IC chips, leads, capacitors, or circuitry as these are miniature electronic components and may be damaged.
5. Place components on a grounded anti-static pad or on the bag that came with the components whenever the components are separated from the system to prevent static discharge. Remember, avoid dropping your hard disk because cylinder of the hard disk is very sensitive and it may never work again if dropped.
6. Dont ever touch the non-serviceable. When you come across labels that say “No serviceable components inside” don’t take it as a challenge because its a serious statement. Remember some parts of a computer are just not meant to repaired and this label is usually seen on the power supply which isn’t a good idea to try to repair. Replacement is best.
Keep in mind that failure to protect yourself can cause injuries and it can also damage your computer and the most common accident is erasing stored data (due to hard drive crash). These are simple things to remember to protect yourself, software, hardware, and most important to protect our precious stored data on our computer.
Tools You Need to Succeed in an Online Business
If you are in any kind of online business, the trick to generating profit lies in generating Traffic. Every article you will come across about making your home business or work at home business successful would always stress the importance of generating traffic.
Traffic therefore is the most essential thing to a successful internet based business. Besides ensuring a great product to sell, and setting up a website, it would be time to get to the task of generating traffic.
If you already have a site and you find that you’re not getting the traffic that you’re supposed to be getting, then its time to reconsider. If you are willing to stay on in these very competitive business, you should always be a step ahead of your competition, and increasing your traffic flow should be your priority.
Here are some seven definite ways to increase your traffic starting with immediate effect.
1) Invest in good advertising with search engines
Google’s Adwords and Yahoo’s Overture provide great advertising schemes that are very truly popular and assures great traffic. This will of course cost you some money. While some would shy away from spending money to increase traffic, it is imperative in this case to do so because Adwords and Overture is the top bet to increase your traffic.
Lots of site feature these advertising system and many have signed on to reap the benefits. Do not be left behind. Every penny is worth it with using Google and Yahoo’s advertising.
2) Exchange or Trade Links with other sites
With exchanging links with other sites, both of you will benefit from the efforts both of you do to enhance your sites traffic. When one site features another sites link, they could provide one another with the traffic one site generates. The efforts are doubly beneficial because it would seem like both of you are working to generate more traffic. The more links traded with more sites the more traffic could be expected.
3) Viral Marketing
Viral marketing allows you to spread the word about your site and product without any cost or probably a little cost. This is a marketing method that can be quite sneaky; you can attach your website name, product or link to a certain media such as a funny video, entertaining game, an interesting article or a gossip or buzz. With this method, people get infected with the creativity and entertainment of the medium that they will pass it on to many people.
4) Search and use proper keywords or keyword phrases for your sites content
Search engines look for certain keywords that they would show in their results page. In doing so, having the right keyword and keyword phrase is a high requirement in ranking high in search engine results. You could write your own content or you could hire someone to do it for you.
5) Write Articles that can lead traffic to your site
Submit articles to sites that would contain the same subject that your site deals in. If you sell mobile phones or its spare parts write press releases and articles about mobile phones and its spare parts. Attach your sites description and services at the end of the article as well as the link.
6) Join forums and form online communities
Capture a market and show your expertise and credibility. When you found a good foundation for your site, people will trust you. In the process your site will pass on to many people their trust. Traffic will certainly increase because they know that you can provide what they need.
7) Lastly, offer newsletters.
If many people know what you are about and your existence is shared with many others, you will find a loyal traffic that can provide you with more traffic by recommendation. If you arouse the curiosity of your customers they would be pushed to help you with your traffic.
Read more…
Traffic therefore is the most essential thing to a successful internet based business. Besides ensuring a great product to sell, and setting up a website, it would be time to get to the task of generating traffic.
If you already have a site and you find that you’re not getting the traffic that you’re supposed to be getting, then its time to reconsider. If you are willing to stay on in these very competitive business, you should always be a step ahead of your competition, and increasing your traffic flow should be your priority.
Here are some seven definite ways to increase your traffic starting with immediate effect.
1) Invest in good advertising with search engines
Google’s Adwords and Yahoo’s Overture provide great advertising schemes that are very truly popular and assures great traffic. This will of course cost you some money. While some would shy away from spending money to increase traffic, it is imperative in this case to do so because Adwords and Overture is the top bet to increase your traffic.
Lots of site feature these advertising system and many have signed on to reap the benefits. Do not be left behind. Every penny is worth it with using Google and Yahoo’s advertising.
2) Exchange or Trade Links with other sites
With exchanging links with other sites, both of you will benefit from the efforts both of you do to enhance your sites traffic. When one site features another sites link, they could provide one another with the traffic one site generates. The efforts are doubly beneficial because it would seem like both of you are working to generate more traffic. The more links traded with more sites the more traffic could be expected.
3) Viral Marketing
Viral marketing allows you to spread the word about your site and product without any cost or probably a little cost. This is a marketing method that can be quite sneaky; you can attach your website name, product or link to a certain media such as a funny video, entertaining game, an interesting article or a gossip or buzz. With this method, people get infected with the creativity and entertainment of the medium that they will pass it on to many people.
4) Search and use proper keywords or keyword phrases for your sites content
Search engines look for certain keywords that they would show in their results page. In doing so, having the right keyword and keyword phrase is a high requirement in ranking high in search engine results. You could write your own content or you could hire someone to do it for you.
5) Write Articles that can lead traffic to your site
Submit articles to sites that would contain the same subject that your site deals in. If you sell mobile phones or its spare parts write press releases and articles about mobile phones and its spare parts. Attach your sites description and services at the end of the article as well as the link.
6) Join forums and form online communities
Capture a market and show your expertise and credibility. When you found a good foundation for your site, people will trust you. In the process your site will pass on to many people their trust. Traffic will certainly increase because they know that you can provide what they need.
7) Lastly, offer newsletters.
If many people know what you are about and your existence is shared with many others, you will find a loyal traffic that can provide you with more traffic by recommendation. If you arouse the curiosity of your customers they would be pushed to help you with your traffic.
Incredible Bodypainting - The Last South China Tiger

Entitled “The Last South China Tiger” this particular project is part of Save China’s Tigers‘ efforts to protect the remaining striped felines in China. Check out the video below to get a better idea of how he put it all together.
Born and Raised in New Orleans, Louisiana, Craig Tracy decides what to paint when he sees the model's body, using their shape as an inspiration for ideas. Sometimes he takes two days to plan before applying the first splash of paint. Once he figures that out, he spends up to nine hours painstakingly applying water-based paint to his volunteers' bodies before photographing them in unique poses.


Not Photoshopped: Just Incredible Forced Perspective Photography

Photo: abmiller99
From Gulliver’s Travels to Alice in Wonderland, the idea of people shrinking and growing has proven endlessly fascinating. What if, we wonder, we were that big or that small? Then along came mass produced cameras, and easy as eating a cake that says “EAT ME”, the more adroit shooters among us were able to realise just such size-shifting exploits – or at least the illusion of having done so. Places around the globe provide backdrops for these fine examples of forced perspective.
Size is everything – or nothing: Salar de Uyuni
Photo: abmiller99
Bolivia’s Salar De Uyuni is a particularly conducive environment for photographers keen to test out their perspective-bending skills. The vast, expansive landscapes of the world’s largest salt plains have few features to shatter the illusion of big objects appearing small or small objects big.
Scots bonsai: Carrot Hill, Scotland
Photo: stuant63
Taken in the Angus area of Scotland, this photo shows that with an isolated tree, a bit of imagination, and no little skill, you can pull the wool over the eyes of human perception. It’s all about the way scaled objects are made to relate to one another and the viewer’s vantage point.
Gobbling a hot dog: Kennedy Space Center 
Photo: toastforbrekkie
This next pic could be construed as being be a little on the lewd side, but that’s up to you. The Kennedy Space Centre at Cape Canaveral, Florida is the launch pad for the visual gag. It’s a good job Space Shuttle Discovery’s STS-121 Mission to the International Space Station wasn’t launched when the photo was taken.
This could be painful: Cape Canaveral
Photo: Lorenia
What is it about Kennedy Space Centre and high jinks with forced perspective? The flat background broken only by the instruments of space launches obviously inspires some people. This photo of a guy doing a good impersonation of a cheerleader even made it onto Japanese TV. Who’d have thought it?
We are not amused: Peggy’s Cove
Photo: lifecreations
Nova Scotia’s Peggy’s Cove provides the setting for this next addition to our list. This small rural community is nevertheless a busy tourist attraction, and its classic red-and-white lighthouse is major focal point for visitors carrying cameras. Believe it or not, it’s almost 15 metres (50 ft) high.
Think big, be big: The Eiffel Tower
Photo: ~Thanh
This touching shot makes aiming for the top not such a fanciful dream after all. The most famous landmark on the Parisian landscape is the perfect prop to make this little girl seem like a giant standing some 324 m (1,063 ft) tall. The low camera angle and large depth of field do the rest of the work.
Just hangin’ around: Perito Moreno
Photo: Alexandre Duarte
This shot was taken at the Perito Moreno glacier in the Argentine region of Patagonia. The 250 km2 (97 sq mi) ice formation is an important tourist attraction, and the sheets of frozen fresh water clearly offer ample opportunity for a little playfulness with visual perspective.
Blowing off some steam: Old Faithful
Photo: toastforbrekkie
This is one instance where you might safely accuse the subject of the photo of being full of hot air – except of course that it’s Old Faithful, Yellowstone’s most famous geyser, producing the steam for this gigantic breath. The creative snapping of nature’s geothermal force delivers a cool result.
Print Ad: Sodimac Homecenter Campaign
Here’s the latest print ad campaign released by Sodimac Homecenter. I like these puzzle pieces idea, simple and understandable. It’s seems that Sodimac Home Center want to say that they complete your home. But they miss the opportunity to say why does this store complete your home more than any other store out there? I think this ad will be more successful for outdoor advertising.


Source


Top 10 Open Source and Commercial Applications
Top 10 Open Source
1. Dia2. OpenOffice Draw
3. Clonezilla
4. Cinelerra
5. Gimpshop
6. StarUML
7. Quanta Plus
8. Avidemux
9. InfraRecorder
10. Gimp
Top 10 Commercial
1. Visio
2. Photoshop
3. Dreamweaver
4. AutoCAD
5. Nero Burning Rom
6. Norton Ghost
7. Movie Maker
8. Illustrator
9. Publisher
10. MSN Messenger
How to Freelance Without Ending Up Penniless
This was a question that I wasn’t sure I was qualified to tackle. I’ve been supporting myself as a freelancer for a year and a half, and I’ve been lucky enough not to have that feast-or-famine cycle. I’ve never faced the situation Allison was in, of waiting six weeks for a paycheck.
However…
It’s struck me that, actually, I set things up from the start to avoid becoming another freelancer horror story. I’ve been used to living on a tight budget (first as a student, then while working full-time and saving up for my MA fees). And one of my resolutions for this year is to keep a closer eye on cashflow and divert what I can towards savings.
So here’s what I did when I started out, and what I’m doing now. I’m focusing on freelancers here, but a good bit of this will apply to 9-5ers and students too.
(If you’ve not got it already, you might want to nab my free ebook More For Your Money – no email address or anything required, just right-click to download the pdf.)
Pre-Freelancing: Saving Up
If you’re not yet a freelancer – if you’re still in college, or you’re still in the 9-5 – then it’s a great idea to build a money-buffer behind you, especially if (like me) you tend to be a tad risk-averse.
I read several freelancing blogs, and the book How to be a Rockstar Freelancer (great read; reviewed here), all of which advised establishing an “emergency fund” as a buffer. I knew I’d have college fees to pay too, so I saved up that and about three months of living expenses.
How? Well, one key way was reducing expenses. Things like:
- We cut way back on how much we ate out.
- I stopped buying new books and hit the library (and very cheap local booksales) more often
- I took packed lunches to work rather than eating out
Yes, they’re little things, but they do add up a surprising amount. And yes, there were times when I wanted to go back to the old days of just hanging out in pubs with Paul and blowing £50 ($80) in an afternoon on food and drinks … but frankly, having a shot at my dream was worth it.
In the couple of months before I quit my job, I was already freelancing on the side, writing a couple of posts a week for two different blogs – I was making perhaps $400 – $500 a month. Most of this, too, went straight into my savings.
Starting Freelancing: Structure Well
Cash flow wasn’t foremost in my mind when I started out freelancing – and it was mainly to reduce admin time that I focused my writing work on blogging. I soon added in a couple of new gigs to the ones I’d had before quitting, and then a couple more.
I’ve been writing for most of my blogs for over a year now (and coming up to two years on the very first one I started as a paid writer for, Diet Blog). Blogs, obviously, need regular new content – I typically write one or two pieces each week for the editors I work for. This is great for practical and financial reasons: I don’t need to keep sending out queries for new work, and I have a chunk of predictable monthly income.
By my second month of freelancing, blogging was covering (just!) my rent and bills. I was obviously doing other work for things like taxes and groceries, but even if I’d just had the blogging alone, the emergency fund would’ve easily kept me going for a good while.
Now, I’m hardly expecting everyone to share my love of blogging, but there are plenty of ways you can find regular work that keeps a roof over your head and food on the table. Here are a few possibilities:
- Get a column in a local paper.
- Get a series in a magazine (you don’t necessarily have to be “a writer” for this; go for a magazine in your particular field of interest or expertise)
- Focus on schools, governmental organisations or large companies which are likely to want repeat work
If you do something like life coaching or website creation (I dabbled in the latter), where clients typically only stay for a short time:
- Find ways to strongly encourage referrals, eg. paying commission
- Offer other services as an ongoing package with a monthly fee
Beyond Freelancing: Create Your Own Income Sources
Even before I started thinking about freelancing, I created a blog (The Office Diet) where the intention was to make some money from my own little corner of the internet. That first blog took eleven months to deliver a cent, but I now earn a small-but-not-insignificant chunk of money each month from advertisers there.
Since then, I’ve also published my own downloadable ecourse (the Staff Blogging Course) and a bunch of affiliate-income-generating reviews (on Aliventures, cunningly named “Reviews”). I’m not making as much from any of this passive income as from my paid blogging gigs … but it’s allowed me to ditch the website work which I used to do, and to stop hunting for any new blogging work, in favour of writing here on Aliventures. J
I really strongly recommend that, if you’re a freelancer, you start seeing yourself as an creative entrepreneur. It took me a while to do this – at first I couldn’t see the point, because $50 in hand seemed much more worthwhile than a potential $50 in several months’ time. But all these little income streams are starting to add up. It reminds me of when Paul and I went and walked from the source of the Thames during September – it didn’t seem like a muddy trickle could ever become the great river we’d walked alongside regularly in London – but as we kept walking, the river gradually grew.
When I wrote the Staff Blogging Course, I hadn’t much of a clue how to create a good sales page, or how to launch a product. I muddled through based on what I’d seen other entrepreneurial types do, but since then I’ve bought the excellent How to Launch the *** Out Of Your Ebook (haven’t reviewed it yet, go read Jade’s review instead). There’s also a big section in The Unlimited Freelancer (review) on creating passive forms of income, with advice for different industries.
If you’ve not got any spare cash to spend on an ebook (and, let’s face it, you’re reading a post about budgeting), then Dave Navarro has some really great free stuff on product creation here – The Launch Coach’s section on Creating Products. Carve out some time in your schedule to go through that, and then to actually do some of it.
Income Rules for Freelance to Live By
Long before dreaming of freelancing, I dreamt of becoming a novelist. (I still do; I’m chasing several dreams at once.) And a lot of advice to novelists tackles exactly the problem that Allison mentions; that money comes in big lump sums, then stops altogether.
So a lot of times, I saw the excellent advice: don’t go out and spend like a loon in the good times.
When I get a gig that promises a big sum, I’m always tempted to up my spending, even before I’ve got the money in the bank. And when money’s flowing well, I definitely relax a little: I’m no believer in being frugal to the point of misery. However … my rule of thumb is to put unexpected cash (especially gifts or advertising payments) into the savings account.
I’m particularly keen on having a decent buffer of money in savings (the current target is to get this back up to £5000, now I’ve paid this year’s university fees and taxes).
I’ve never had a credit card, and I only have a £50 overdraft. I know that, if the money was there, I’d be too tempted to spend it – and without a definite paycheck, I can’t risk spending money I don’t have.
I’m lucky, I know that. I’m in an industry where regular work is an easy possibility, and where I can create my own products without any cost but time: words are free. I’ve not got any dependents, and I didn’t have any debts when I started freelancing. We don’t have a car.
I’m very aware that for you, life may be a lot trickier. You may have to stick it out in a day job much longer than you want, in order to get together an emergency fund. You may have little choice but to take freelancing gigs which give you a sporadic income. Your passion might be one which would leave you broke. You may already be in financial difficulties. If that’s you, please talk to a professional, or at least read one of the very good amateur personal finance blogs (Trent Hamm’s The Simple Dollar is my favourite).
However you organise your work and your money, don’t let freelancing turn into working crazy hours for peanuts. You started freelancing to be freer … not to end up enslaved. If you’ve found yourself in a binge-or-starve cycle, figure out how to get out of it. Talk to other freelancers in your industry, and find out what they do. However tough it might seem right now, there will be an answer.
30 Days to Become a Freelancer
If you’ve ever thought about freelancing part-time but never done it, this post may help you. Most people never follow through on those thoughts because they are overwhelmed and confused by the process of starting a freelance business. The aim of this post is to provide a step-by-step guide to launching a part-time freelance business in 30 days, going from zero to taking on your first client.
The format for this challenge was inspired by the excellent 31 Days to Build a Better Blog program, which concluded recently. I really like this approach because it offers concrete, practical steps with a measurable result. Sometimes ‘do this, do that’ advice is more useful than theory. My hope is that you can follow the steps here, putting one foot ahead of the other, and find yourself with a little freelance business at the end of the process!
The program is designed to be completed while you are working full-time, either by dedicating a couple of hours in the evening or mornings, or working on the program over the weekend. It should be combined with daily hands-on practice in the skill you want to freelance in, particularly if you are a novice in that skill. If you are a novice, don’t delay the program until you feel you are ‘good’ enough. The emphasis is on selling a very specific skill that you can become good at in a short period of time. 30 days practicing one hour a day is more than enough time to develop a specific service that you are good enough at to sell.
The main aim of this program is to help you learn how to monetize a skill that puts you into flow. This will make you a happier and wealthier person!
If you’re going to create your freelance business in 30 days, you can’t afford to waste any time - so let’s get started.
Day 1
Decide on the one service you will offer. I emphasize picking only one specific service because without freelance experience, you are probably not already highly skilled in the area you want to freelance in. Even if you have been practicing it as a hobby for a long time, providing that skill as a service is a different challenge.
If you are wanting to freelance in web design, don’t offer everything and the kitchen sink to begin with (complete design + front-end code). Provide PSD mockups only. If you’re more on the dev side of things, start with some code slicing jobs. If you want to write, start with one specific kind of writing.
This approach will help you become skilled in the service you provide very quickly. Since you want to be taking on your first client in 30 days, it’s crucial that you develop your skills to an adequate level. Once you become comfortable with providing that one service, you will naturally expand what you offer.
Day 2
Gather learning materials to help you practice your service before taking on a client. As I mentioned in the introduction to this list, you should spend at least 1 hour per day just developing your skill. While this should be mainly direct practice (doing rather than reading about), you will need to gather materials to guide you here. This includes articles, interviews and tutorials. Focus mainly on developing techniques you could actually see yourself using in client work.
Day 3
Decide on a business name - are you a studio or individual? Then, buy the domain name and hosting. You can freelance under your real name, a pseudonym, or a business name. Here are some example business names I generated with this cool little thing:
- Flying Dog Design
- Green Ant Productions
- Scarlet Zebra Interactive
- Blue Cat Labs
- Chestnut Rabbit Solutions
- Golden Lemur Studios
- Friendly Kangaroo Ltd
- Evil Pencil Media
Of course, some of these are really absurd, but they do give you an idea of some common naming conventions.
Once you’ve picked a name, it’s time to buy the domain for that name. If there’s no domain available for that name, pick another one. Your domain branding is really important.
Buy a domain name that comes with web hosting, as the next branding step is to create your portfolio.
Further reading: Naming Your Freelance Business - To Personalize or Not (With a Poll!)
Day 4
Design your products. This is different from the service you are going to offer - here you decide how it is going to be packaged. Are you going to sell blocks of time? Completed projects? What will your rates be?
Your goals should be modest as you are only starting out, both in terms of how much you will work and how much you will charge. For your first job, I would suggest an hourly rate between $20 - $30. Keep in mind that you don’t publish these rates online and can therefore change them from client to client. Just because you do one job at $20 an hour as you’re starting out doesn’t mean you can’t be charging $50 an hour a few months later.
Per-project rates are a great option down the track as they decouple the direct exchange of time for money. I don’t recommend them to a beginning freelancer, though. It will be extremely difficult to come up with an accurate price estimate before you have the experience you’d need to look at a project and quickly have a reasonable idea of how long it is going to take. That’s something that will only come with time and experience. (Note that this advice doesn’t necessarily apply to smaller jobs like article writing.)
Day 5
Set up a business email address and PayPal account. While your friends and family might not mind receiving email from ronny69@hotmail.com, prospective clients might! Create an email address linked to your new domain name. Forward it to a free Gmail account, then under your Gmail settings, put your domain email address as your default ‘Send Email As’ address. This will allow you to manage your domain email through Gmail, rather than the dubious email UIs provided by most webhosts.
A good format is
Next up you should create a PayPal account if PayPal is available in your country. If not, try Moneybookers. Most online freelancing is paid via PayPal and I consider it a must-have. If you dislike the fees, you can build them into your rates.
If you already have a PayPal account, it might be a good idea to think about changing your address to something linked to your business, i.e. ‘accounts@yourdomain.com’ or ‘paypal@yourdomain.com’.
Day 6
Set up Wordpress under your freelance business domain. Every freelancer should have an online portfolio, even if it’s very simple. If you’re a designer with time to spare you can probably take control of this step. If you want a quick solution that is quite effective, download Wordpress and install it under your domain name.
Day 7
Select and install a portfolio Wordpress theme. This platform will give prospective clients the means to learn more about you and your services, view your work, and contact you. You can browse some great Premium options under $30 at ThemeForest.
Day 8
Write your portfolio ‘About’ page. Include your current location, any relevant qualifications you have, previous work you have done in the industry and previous clients you have worked for (don’t worry if there are none). This is particularly relevant if you’ve been working in your field before going freelance. Keep in mind that this should be mainly professional rather than personal, but you can include some personal info at the end if you want. If you’d like to include a picture, a specially taken portrait is a good option.
Day 9
Sign up at Formspring and create your ‘Contact’ form. I use Formspring often in my job and I think it’s an excellent way to create intelligent contact forms. You can use this form to find out what kind of work the client is looking for and even what their budget is. All this information will help you when it comes time to write your response and close the sale.
Day 10
Design your invoice template. If you fancy yourself a designer, create an attractive template for your invoices. As someone who spends time receiving and paying invoices, they do affect my perception of how professional the freelancer is. If you aren’t confident in your design skills then I would create an account at Freshbooks. They’re my favorite free invoice management service and I’ve used them often.
Day 11
Set up your home office space. You’re a freelancer now, so you need space to work. A room dedicated just to your work is ideal, but if you don’t have that luxury (I know I don’t!) set up a desk or table in one of the quieter rooms in your house. A bedroom is a good option, but keep in mind that you probably won’t be able to get away with late nights - or possibly early mornings - if sharing with someone else!
In my experience, the cornerstones of an effective home office are a computer that works quickly, a good chair and a large monitor, or multiple monitors, for better productivity.
Day 12
Create a logo OR commission a logo OR work more on your skills. While not every freelancer has their own logo, it’s a fantastic addition to your branding. You can use it in emails, watermarks, business cards, invoices, your portfolio and when presenting work to your clients. If you don’t want a logo or don’t have the budget yet, work more on your skills today.
Day 13
Start work on a portfolio item - you will have 5 days to complete this. More important than having items in your portfolio is the practice you will gain from completing this exercise. By the end of the 30 day challenge you will have three items in your portfolio, and this is the first. These items should involve the exact skills you will be selling to clients.
Here are some ideas for portfolio items in various industries:
- Copywriting - write an original sales page for an existing product or service.
- PSD to code slicing - purchase a cheap PSD template and convert it into a functioning demo site.
- Writing - write an article suited to appear in the kind of publication you want to work for.
- Web design - create a one-page design.
Day 14
Add a page to your portfolio describing your one service. You should call this page ‘
Day 15
Read Freelance Switch’s guide to Getting Started as a Freelancer. There are some great articles here that cover all aspects of getting started with freelancing in more detail. If you have questions, you’ll find answers here.
Day 16
Familiarize yourself with tax laws for freelancers in your country. In my job I often receive invoices from Australian freelancers without an Australian Business Number listed. Unknown to them, it is actually illegal for me to pay them without that 11 digit number. Luckily it only takes a few minutes for them to apply for and receive their ABN once notified about this, but your country may have stumbling blocks of its own - and they might be a bit trickier to deal with!
Make sure you’re aware of the tax and government requirements freelancers must comply with in your country. A good place to start is the website of your national or state tax office.
Day 17
Announce that you are going to be taking on freelance work soon. If you already have an audience online, whether it be blog readers, your social media network or forum buddies, let them know that you’ll be available for freelancing soon. This will build a little bit of buzz and anticipation. If you’re really lucky, you might even be able to line up your first client before you’ve officially opened for business!
Day 18
Start work on portfolio item #2, add item #1 to your portfolio. Now that contains some work, you have a genuine portfolio. Now we’re going to work on beefing it up by adding a couple more items. Item #2 should again illustrate your one service, though approached from a different angle. If your first sales letter was for skin cream, the second might be for a membership site, and demonstrate a different selling style. If your first PSD to code conversion was for a Wordpress blog, the next one might be for a business site.
Day 19
Perform some simple SEO on your portfolio. Sprinkling a little SEO-dust on your portfolio can eventually help to bring a trickle of prospects to your portfolio on autopilot. To begin with, use likely keywords in your portfolio title (i.e. ‘Jane Smith: Flash game designer - Melbourne, Australia’). Try to work keyword phrases into your copy and page titles if they seem natural. Install a Wordpress SEO plug-in like the All-in-One SEO Pack. If you want to learn more, read SEOmoz’s Beginner’s Guide to Search Engine Optimization.
Day 20
Make your portfolio public (link it up everywhere). It’s time to debut yourself to the world (very quietly). Google can’t know about your portfolio if it can’t find it, so you need to leave a trail. You give Google that trail by linking to your portfolio wherever you can. Start by linking to it on every online property you have ownership over - blogs, Facebook pages, forum signatures, email signatures, Twitter profiles, Flickr profiles, etc.
Day 21
Create free portfolios and profiles wherever you can. Yes, you already have a portfolio, but you want to get your work out to as many people as possible. Some prospective clients may never know the right keywords to find your site, but they might browse Carbonmade or LinkedIn instead.
Day 22
Sign up to job boards relevant to your industry and subscribe to their RSS feeds. The Monster List of Freelancing Job Sites is your roadmap here. You don’t need to apply for any jobs today - your only task is to gather a ‘watch list’ of job boards and sites. Browse through some of the jobs available to get an idea of what’s out there, but don’t apply for anything yet.
Day 23
Start working on portfolio item #3, add item #2 to your portfolio. Another portfolio item done and dusted - well done! It’s now time to move on to item #3, your final item in the 30 day challenge. Once again, show your ‘one service’ in a different shade. This time, create the item as if you were working for the type of client you most want to work for. If you’d love to write sales pages for high-end internet marketing products, make that item #3. If you’d love to get work as a live show photographer, go out and photograph a gig in your area. The type of items in your portfolio will affect the kind of work you get. I think this quote from freelance designer Barton Damer illustrates this well:
“A couple years ago, I began only posting projects I love. I pulled down logos, brochures, etc. off my portfolio and only posted digital art. The result, people started contacting me for digital art!” (Source)
Day 24
Announce that you are now available for freelance work. Most people prefer to hire someone they know. They could spend 30 minutes searching online and probably find somebody more talented than you are (there’s always someone more talented!), but people place a lot of value in feeling they can trust the person they’re working with. That’s why your existing network and audience is an excellent place to find work. Post about it on your blog, tweet about it, update your Facebook status. Let the world know that you’re ready to work!
Day 25
Apply to 10 jobs on various job boards. Over the last few days you’ve hopefully been keeping tabs on your jobs ‘watch list’. You may have earmarked a few jobs that looked good to you. Now is the time to really take the plunge and start applying for work.
I have advertised for freelancers before and I speak from experience when I say that by following the instructions in the job ad very carefully you will launch yourself into the top 5% of applicants. Seriously!
A friend of mine recently applied for (and won) a job in web development. The instructions in the job ad stated that the subject line of the application email had to contain the word ‘Elephants’. Though a little confused by this request, he complied. Later on after winning the job he learned that although the company had received close to 100 applications, only 7 of them contained the word ‘Elephants’ in the subject line. The company did not even open the other 93 emails. For them, the ‘Elephant’ instruction was a way to test the applicant’s attention to detail.
As a final note, make sure to only apply to jobs that match your ‘one service’. If you can’t find 10, don’t broaden your scope just to make up the number. If you end up applying for and winning a job that requires skills you don’t have, you may also end up delivering a sub-standard end product to the client. Remember: you want this job to be something you can add to your portfolio!
Day 26
Email 10 prospective clients. Erm… didn’t you just do that? Yes, but this kind of emailing is different. Here you are offering your services to people who don’t know they need them yet. If you’re a PSD to code slicer, look for the portfolio of a web developer who states that they are not taking on new work at the moment. This means they’re really busy. Send them an email presenting yourself as someone trustworthy to outsource to and help them get through more clients. (Note: this works in just about any industry, not just design.)
Next, look for people who might need your skills for other reasons. If you’re a freelancer blogger and you know a good blog that pays for content, email the owner and offer your services. If you’re a copywriter and find a lackluster sales page, offer to create something better. If you find a website that’s poorly coded, offer to shore it up with impeccably valid and clever code.
Keep in mind, though, that when presenting your services as a ‘better’ option you are often talking to creator of the original. If something looks DIY, it probably is. Rather than criticizing the original, point out the virtues of a professional service.
Day 27
Exchange your skills for promotion. Money is not the only currency a freelancer earns. They also earn promotion, referrals and reputation. Today your goal is to trade your skill for promotion and exposure. Pitch a guest-post to one of your favorite blogs. Offer to create a logo for a popular website that doesn’t have one yet. If there are errors in their web design, offer to fix them.
The key here is not to do something for free and hope that you get something in return. Negotiate this exchange like you would if you were being paid in cash. Outline specifically what you want in return. Do you want to be mentioned in a site update? Do you want a testimonial? Do you want a post written about you? Do you want a banner on the site for a set period of time?
You’re providing the client with something of value, so you should expect to receive something of equal value in return. It’s essential that this arrangement is made before you do any work at all. This guarantees you won’t waste your time and that you won’t spring any surprises on a client who thought they were getting free work without any strings attached!
Day 28
Create a Twitter account for your business. If you already have a Twitter account, consider whether it is consistent with your business branding. If not, you might want to consider creating a separate business Twitter account. The point of this is to get your clients to follow you. This is, in my opinion, the best possible way to stay in the minds of previous clients and encourage repeat work. Some freelancers are so good at generating repeat work that they don’t even need to look for new clients! If you begin working towards this goal from the beginning you will give yourself a useful head-start.
If you create a Twitter account for your freelance business, make sure the visual branding is consistent with your portfolio. You need consistency to create a ’sticky’ brand that clients remember.
Here is a quick introduction to Twitter for freelancers.
Day 29
Ask 5 people for a testimonial. Testimonials are solid gold to a freelancer, yet most of us don’t know it. Consider that more than talent, more than cheap rates, more than a slick portfolio design, prospects are looking for someone they can trust. Your portfolio items help them trust that you do good work. Your client list helps them trust that you are professional. Your testimonials help them trust that you are good to work with and deliver what you’re paid for.
Even though you don’t have clients yet, you can still have testimonials. A testimonial is, at heart, a statement vouching for you. Clients are not the only people who can provide these. If you’re a designer, get a testimonial from someone who thinks your work is great. If you’re a blogger, get a testimonial from a reader who thinks you’re talented. And finally, something anyone should be able to do: get a testimonial from a friend who thinks you’re a good, kind, trustworthy person.
If you feel uneasy asking for a testimonial, look through comments, tweets and emails about you. When people say nice things, that’s an instant testimonial you can use.
Day 30
Add portfolio item #3 to your portfolio, then buy yourself a home office gift for completing 30 days to become a freelancer! Your portfolio now contains 3 items - not bad at all! You’ve been working hard these last 30 days. Whether you have found a client yet or not, you’ve set up your own freelance business, and that’s an achievement. To celebrate, buy yourself an upgrade to your home office - something you will use to improve your business. Whether it’s a 30″ screen or a nice packet of ballpoint pens will depend on your budget, of course…
If you haven’t won a job yet, don’t worry. Your first job is always the hardest to land, and the process will get easier over time. Keep applying to any job that looks good, building your skills and your portfolio. Eventually your tenacity will be rewarded.
From Moonlighting to Daylighting
While you’ll begin doing 5 - 10 hours of freelance work a week, plugging away at it on evenings and weekends, you may eventually decide that you’d like to make freelancing your primary source of income. While much has been said on transitioning from part-time to full-time work, I can’t stress enough the importance of a financial safety net. Ideally you should use the extra income gained from part-time freelancing to build the cushion you’ll need when you go 100% solo. Having said that, most freelancers won’t make the jump until they are consistently turning down good quality job offers that they don’t have the time to complete while moonlighting. Chances are you won’t need to rely on your safety net, but it’s still an essential.
Taking it to the Next Level
What I’ve outlined here is really the most basic kind of freelance business. It’s effective and can be very lucrative, but there is still more you can do. I’ve not had the space to touch on more advanced SEO strategies, creating a launch process for your services, using a blog to funnel clients into your business, building a referral program, becoming an industry leader to charge premium rates, and other advanced business strategies. I know many Webusabilityhelp are just getting started, so I don’t think it’s appropriate to post these high-level strategies on the blog. Instead, I’ll put them in the newsletter I mentioned in the ‘flow’ post. Don’t worry - it’s getting closer to being ready every day!
A Markup That Could Have Big Implications for SEO
RDFa, which stands for Resource Description Framework in attributes, is a W3C recommendation, which adds a set of attribute level extensions to XHTML for embedding rich metadata within web documents. While not everyone believes that W3C standards are incredibly necessary to operate a successful site, some see a great deal of potential for search engine optimization in RDFa.
In fact, this is the topic of a current WebProWorld thread, which was started by Dave Lauretti of MoreStar, who asks, "Are you working the RDFa Framework into your SEO campaigns?" He writes, "Now under certain conditions and with certain search strings on both Google and Yahoo we can find instances where the RDFa framework integrated within a website can enhance their listing in the search results."
Lauretti refers to an article from last summer at A List Apart, by Mark Birbeck who said that Google was beginning to process RDFa and Microformats as it indexes sites, using the parsed data to enhance the display of search results with "rich snippets". This results in the Google results you see like this:

"It's a simple change to the display of search results, yet our experiments have shown that users find the new data valuable -- if they see useful and relevant information from the page, they are more likely to click through," Google said upon the launch of rich snippets.
Google says it is experimenting with markup for business and location data, but that it doesn't currently display this information, unless the business or organization is part of a review (hence the results in the above example). But when review information is marked up in the body of a web page, Google can identify it and may make it available in search results. When review information is shown in search results, this can of course entice users to click through to the page (one of the many reasons to treat customers right and monitor your reputation).
Currently Google uses RDFa for reviews, but this search also displays the date of the review, the star rating, the author and the price range of an iPod, as Lauretti points out.
Best Buy's lead web development engineer reported that by adding RDFa the company saw improved ranking for respective pages. They saw a 30% increase in traffic, and Yahoo evidently observed a 15% increase in click-through rates.(via Steven Pemberton)
Implications for SEO
I'm not going to get into the technical side of RDFa here (see resources listed later in the article), but I would like to get into some of the implications that Google's use of RDFa could have on SEO practices. For one, rich snippets can show specific information related to products that are searched for. For example, a result for a movie search could bring up information like:
- Run time
- Release Date
- Rating
- Theaters that are showing it
"The implementation of RDFa not only gives more information about products or services but also increases the visibility of these in the latest generations of search engines, recommender systems and other applications," Lauretti tells WebProNews. "If accuracy is an issue when it comes to search and search results then pages with RDFa will get better rankings as there would be little to question regarding the page theme." (Source) He provides the following chart containing examples of the types of data that could potentially be displayed with RDFa:

"It is obvious that search marketers and SEOs will be utilizing this ability for themselves and their clients," says Lauretti. Take contact information specifically. "Using RDFa in your contact information clarifies to the search engine that the text within your contact block of code is indeed contact information." He says in this same light, "people information" can be displayed in the search results (usually social networking info). You could potentially show manufacturer information or author information.
RDFa actually has implications beyond just Google's regular web search. With respect to Google's Image search, the owner of images can also use RDFa to provide license information about the images they own. Google currently allows image searchers to have images displayed based on license type, and using RDFa with your images lets the search bots know under which licenses you are making your images available (Via Mark Birbeck). There is also RDFa support for video.
Google Introduces Rich Snippets
Introduction to RDFa
RDFa Primer
About RDFa (Google Webmaster Central)
RDFa to Provide Image License Info
RDFa Microformat Tagging For Your Website
For Businesses and Organizations
About Review Data (Google Webmaster Central)
Google's Matt Cutts has said in the past that Google has been kind of "white listing" sites to get rich snippets, as Google feels they are appropriate, but as they grow more confident that such snippets don't hurt the user experience, then Google will likely roll the ability out more and more broadly. This is one thing to keep an eye on as the year progresses, and is why those in the WebProWorld thread believe RDFa will become a bigger topic of discussion in 2010.
WebProNews would like to thank Dave Lauretti, who contributed some findings to this piece.
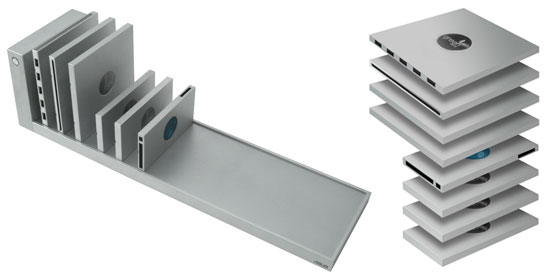
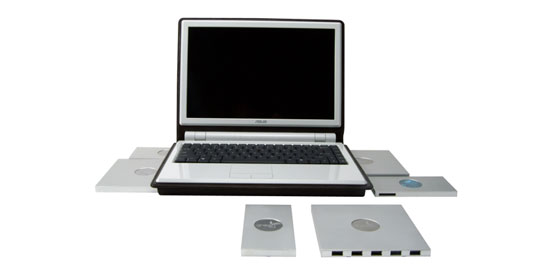
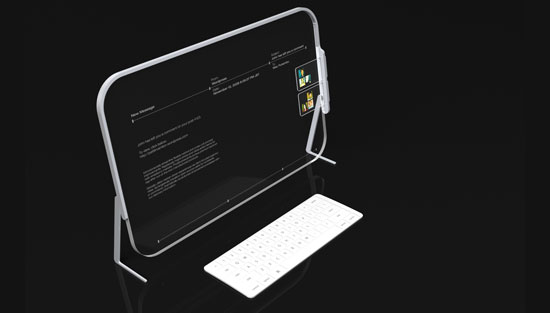
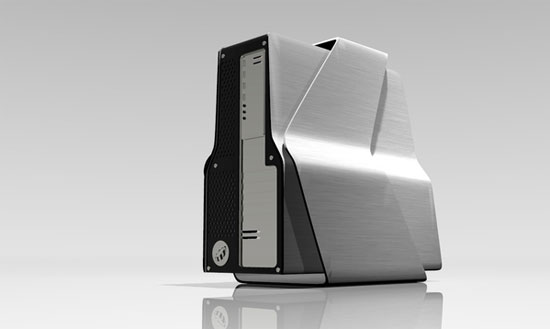
Amazing Computer Concept Designs You Wish Were Real
Concept designs are great and frustrating at the same time. They’re wonderful because they give us a glimpse of the future and push the industry towards innovation and outside-of-the-box thinking, but agitating because we know we can’t have them right now. It can’t hurt to look at them though so that at least we can put money in the bank to save up for them when/if they go in production.
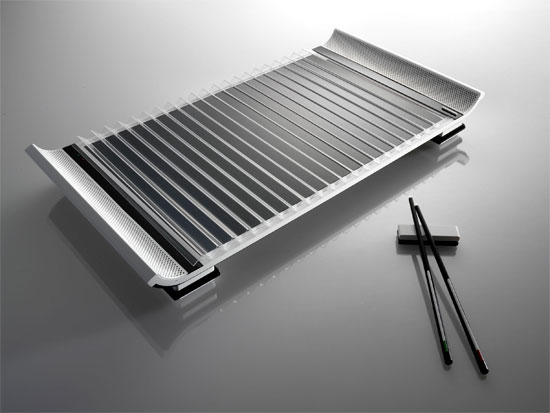
Asus Bookshelf PC
The Asus Bookshelf PC modularizes computers by breaking them down into interchangeable parts, making upgrading (and downgrading) a walk in the park.
MADE in China
John Leung’s MADE in China is a Next-Gen PC Design Competition winner with looks inspired by traditional Asian objects.
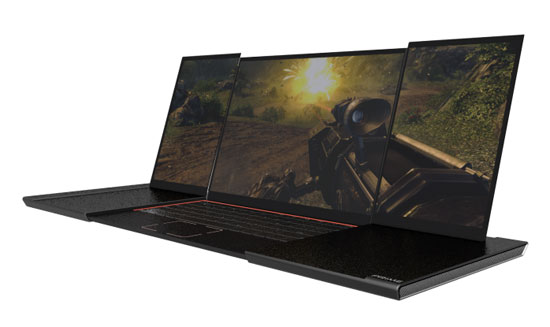
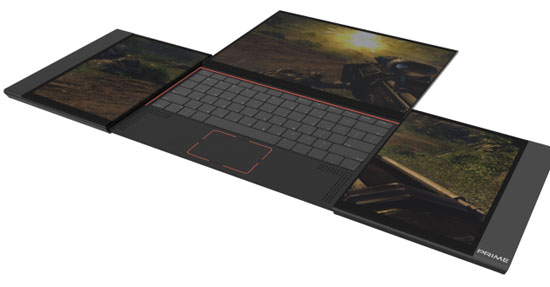
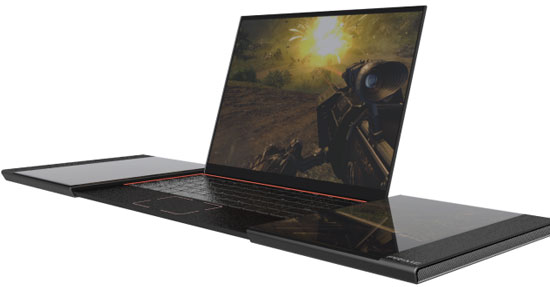
Prime Gaming Laptop
Kyle Cherry’s Prime Gaming Laptop concept solves the issue of monitor and body size constraints of laptops and the portability inconveniences of desktop gaming rigs.
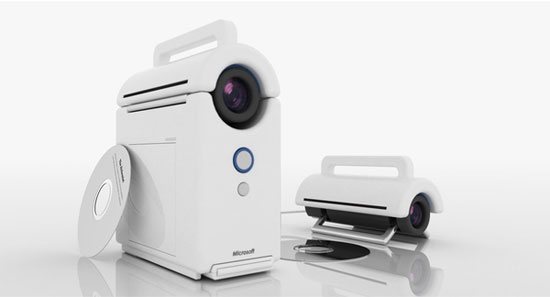
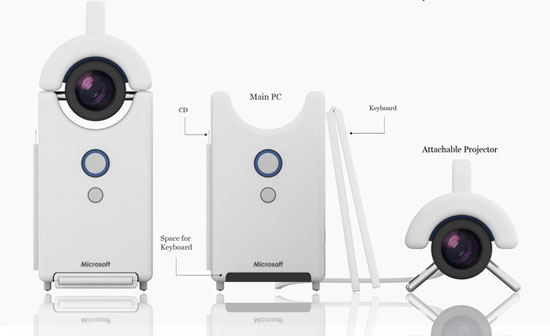
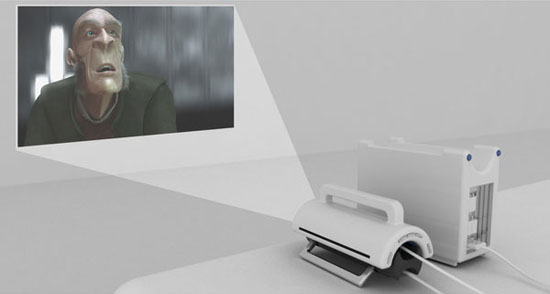
Portable PC Theater
Korean Industrial/Product Designer Jinwoo Han created a concept for a Portable PC Theater with a built-in projection screen for mobile entertainment environments.
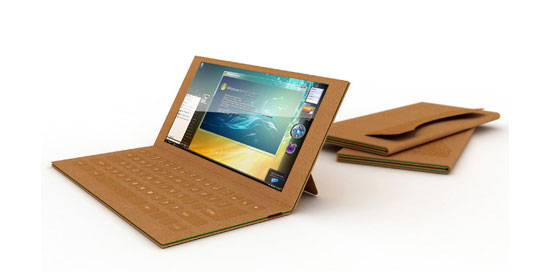
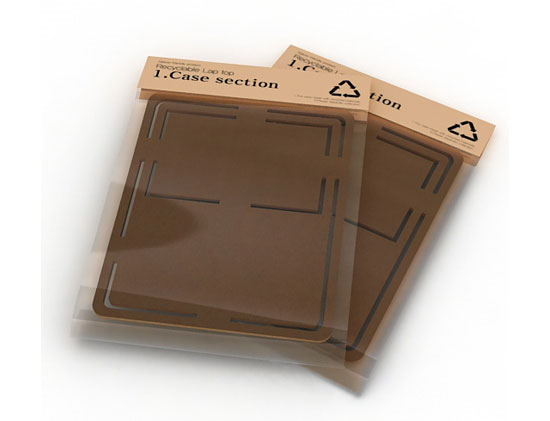
Paper Laptop
With discarded computer parts being an environmental concern because they fill up landfills, Je Sung Park’s Paper Laptops are crafted from recyclable paper.
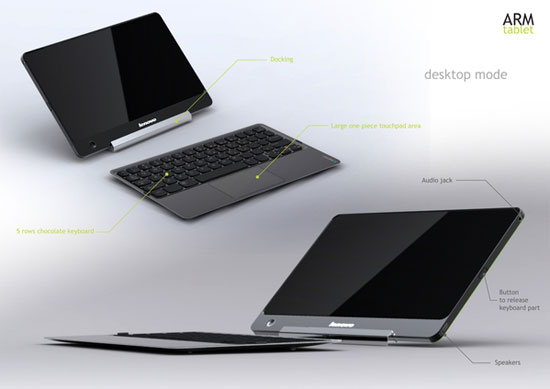
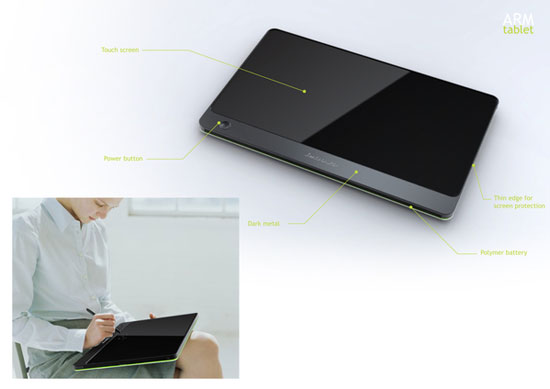
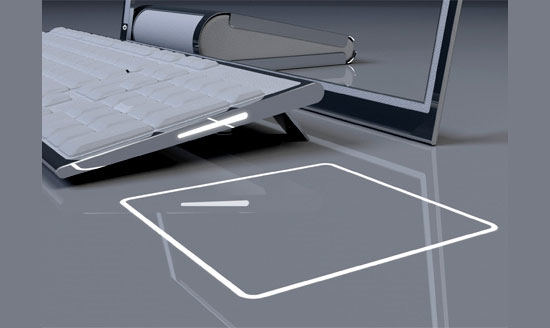
ARM tablet
The ARM tablet by Sébastien Maleville is a tablet PC that has a desktop mode that allows you to separate the body into a monitor and keyboard.

HP LiM
The HP LiM (Less is More) by Jeffrey S. Engelhardt will feature a single-body form factor and a transparent monitor screen (for "badass" points).

B-membrane
The B-membrane, which without context looks like a UFO, is a single-body computer concept that has a built-in projection screen as its monitor.


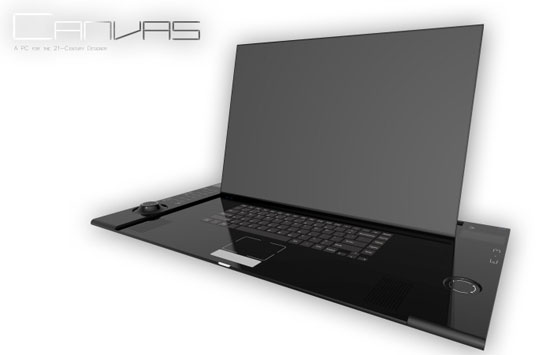
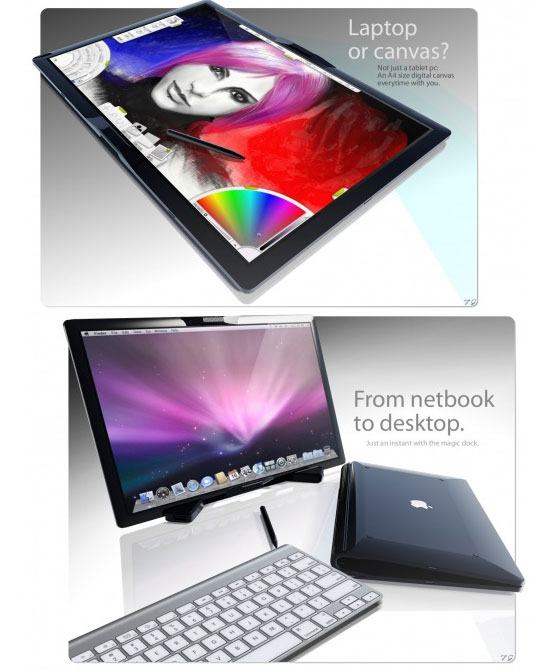
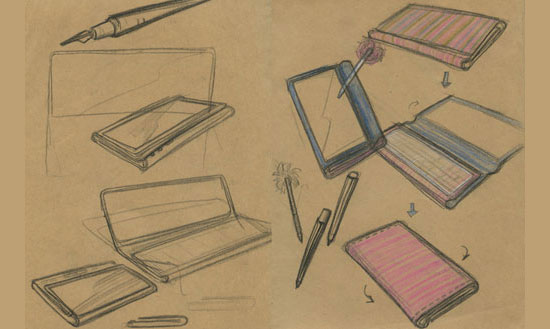
Canvas
The Canvas concept by Kyle Cherry is targeted towards the modern designers and artists. It has built-in input devices for digital art creation.


Philco PC
While most computer concept designs look towards the future, Dave Schultze goes the opposite direction with a vintage-inspired computer concept called the Philco PC.


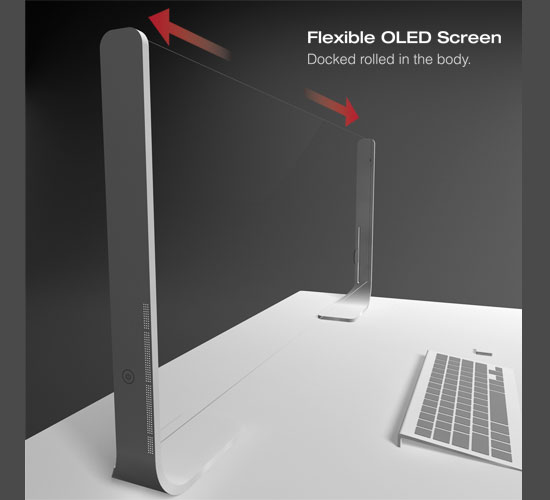
Horizon
The Horizon desktop computer concept by Japanese designer Mac Funamizu has an OLED monitor so that it can expand and contract.

MacBook Touch
The MacBook Touch is a computer concept that combines the iPhone/iPod Touch touchscreen interface with Apple’s popular MacBook laptops.
Pocket Yoga
The Lenovo Pocket Yoga is a small PC that—as the name suggests—fits comfortably in your back pocket (or front pockets if you have big pants on).


Zafiro
The Zafiro concept is a transparent glass screen computer concept that uses hand and body gestures for its user interface; very Minority Report’que.

MAINGEAR
Nuno Teixeira’s MAINGEAR desktop concept is for a professional/gaming high-end performance desktop that has a bridge-like body for improved cooling.

HP Tablet and Docking Concept
A realistic product design, the HP Tablet and Docking Concept shows off a convenient way of docking your tablet PC for when you’re in your workspace.


Cuppa
Cuppa has one purpose: to keep you connected to social networks while on the move. It has an RFID reader, ambient displays on the keyboard, and a revised keyboard layout.


Bookshelf PC
Sunho Son and Scott Shim created a conceptual Bookshelf PC that shelves your multimedia entertainment center; it’s modular, compact, and pure eye candy.


